Automatic Hatching
|
Automatic Hatching |
Because the hatchings are defined by the material, all parts that use this material will have the same hatchings when cross sectioned. This command allows you to automatically modify the hatchings on dimension-to-dimension parts having the same hatchings.
|
|
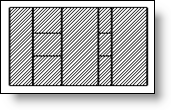
Default Cross section |
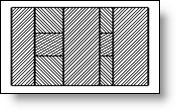
Cross section with Auto Hatching |
Creation stages / Use:
Click the icon or select
View > Automatic Hatching...
command from the drop-down menu.
Select the view(s) in which to make the auto hatching.
Modify the value of the angles if necessary.
Validate.
Options Supplémentaires :
|
Spacing : TopSolid calculates the area of each
hatching area and it sorts them in ascending order.
- Hatching which is in the 1rst third use the spacings "Small" - Hatching which is in the 2nd third use the spacings "Medium" - Hatching which is in the 3rd third use the spacings "Large" |
|
Borders : it is possible to define area value which define the borders between the spacing small, medium and large. Specified area match with the paper dimension. This option can be useful for example if the cut has a quantity of small sections and some larger sections. It avoid to have small sections which use a spacing too large. |
|
When we click on hatching area in a view, the area is automatically added in the option Borders. It can be easily to define the borders value. It is more visual. |
|
|