icon or select
Detailing > Chamfer Dimension...
from the drop-down menu.
icon or select
Detailing > Chamfer Dimension...
from the drop-down menu.
|
Chamfer dimension |
This command allows you to create chamfer dimensions.
Creation stages / Use:
Click the icon or select
Detailing > Chamfer Dimension...
from the drop-down menu.
Check Exported symbol to have a chamfer dimension with a broken leader. If the option isn't checked, the dimension is normal to the edge of the chamfer.
Select the chamfer to dimension.
Select a reference direction. The angle will be calculated regarding this direction. For an angle of 45°, this direction is not so important.
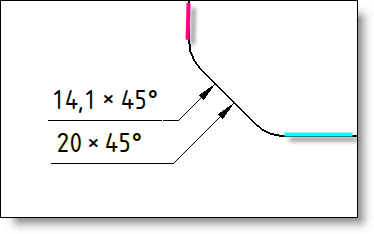
Select a second direction if needed. If this direction is selected, the chamfer value will not be the length of the chamfer line, but the distance between intersection points of this extended line with the 2 selected directions. (see the image below). The reference segment will be the first segment (blue) near the beginning of the chamfer, the second direction will be the segment (magenta) near the end of the chamfer. In this example, if the second direction is not selected, the value will be 14.1x45°, if it is selected the value will be 20x45° (which is correct).
|
Select a chamfer dimension style or create a new one by clicking on " + ".
Validate by clicking  .
.
|
The reference direction is particularly important when a chamfer has an angle other than 45°. |
Available Options:
Orthogonal leader: This option allows you to always have an arrow normal to the selected geometry.
Style: Select the chamfer dimension style to use Normal Style (default) or a customized chamfer dimension style.
Information:
Prefix: This option allows you to add a prefix to the chamfer dimension.
Suffix: This option allows you to add a suffix to the chamfer dimension.
Separator: This option allows you to modify the separator between the dimension and the angle. For example, you can write 1 to 45° or 1x30°.
Manual text: This option allows you to force the text of the chamfer dimension. In this case, it will be surrounded in yellow.
Angle visibility: This option allows to display or not the angle of the dimension.
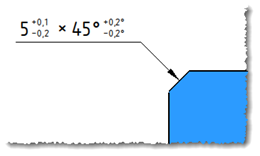
With a chamfer of 5mm and 45°, if the Visible option is chosen, the dimension will be 5 x 45° whereas it will be 5 if the option Hidden is chosen.
The Inherited from style option allows to get the setting from the used style.
Tolerance:
Length: This option allows you to add a tolerance on the length value of the chamfer dimension.
Angle: This option allows you to add a tolerance on the angle value of the chamfer dimension.
Format:
|
Font : Show the name and the dimension of the font used. Check option Fonts to activate the button and modify the settings (fonts, style, dimensions, effects ...)
This window have two tabs:
|
||||
|
This option allows you to select a text framing: None, underlined, framed, in an obround, under an arc or between brackets. When the underline, framed, in an obround or under an arc mode is selected, you can define a margin between the text and the framing. |
||||
|
Allows to adjust a distance between the text and its frame. |
||||
|
If this option is activated, the arrow origine is on the center of the text enclosing box and it is limited by its frame. |
||||
|
This option allows you to compress or extend the chamfer dimension text. |
||||
|
This option allows you increase the gap between characters of the chamfer dimension text. |
||||
|
This option allows you to choose the color of the chamfer dimension. |
||||
|
This option allows you to choose the layer of the chamfer dimension. |
Advanced options:
|
Extremities:
|
Modifications:
To change an existing note, simply select it with the right button and select the command Edit.