
Dimension
|
Dimension |
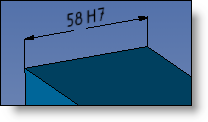
This command allows you to create toleranced dimensions by pressing the 3D geometry. This dimension will be visible when exporting the part if the chosen format supports 3D annotations.
Creation stages / Use:
Click the icon or select
Tools > Annotations >
Dimension... command from the drop-down menu.
Select the plane on which to "write" the dimension.
Select the vertical direction.
Validate by clicking  .
.
|
|
|
|
|
The dimension plane is determined automatically selecting the geometry and can be modified manually using the Change plane button or the Ctrl + Space keys on the keyboard. |
Available Options:
Screen Size:
|
This keeps the annotation readable: it maintains its size on screen regardless of the zoom level or the orientation of the part. |
Scaling (available when the Screen Size option is not enabled):
|
Allows to customize the scale factor for displaying the note. |
Text:
|
|
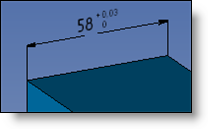
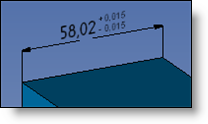
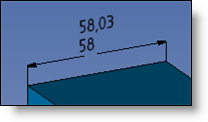
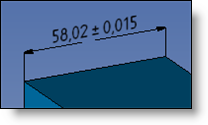
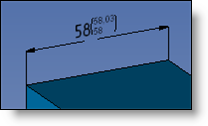
Tolerances:
|
|
Upper and Lower Spreads. |
|
Symmetrical Spreads. |
|
Minimum and Maximum Values. |
|
Medium Spread. |
|
Quality Symbol. |
|
Quality and Upper and Lower Spreads. |
|
Quality and Minimum and Maximum Values. |
|
Exponent Medium Spread. |
|
Format (available when the Screen Size option is not enabled):
|
Allows to define the framing of the note and its line color.
Allows to frame the note. possible frames are: None, Underlined, Framed, Flagged.
Allows to adjust a distance between the text and its frame.
If this option is activated, the arrow origine is on the center of the text enclosing box and it is limited by its frame.
To use another color,
select the color cell and select a new
one to use. To remove this color, use the
Assign a layer to the element. The layer can be created on the fly by clicking the "+". |
Advanced options (available when the Screen Size option is not enabled):
|
Allows to modify dimension extremities: leader style, size, ...
This option allows to modify the attributes of each constituent of the element. In this way, it is possible to modify individually:
It is possible to modify the following attributes:
The mask allows to define if an element hide or not the lines behind in order to make the draft comprehension easier. There is 4 masking level: Low, Medium, High, Very high. The mask hides all elements that have a lower masking level. A low level element does not mask anything. An element with a medium masking level will hide elements with low level but will be hidden by element with high masking level or very high masking level.
The Leader anchor point can can be modified checking the Alignment cell. It is possible to define:
|


 icon.
icon.