This command allows to create a post-processing style that could be
used with the Realistic
rendering command.
A post-processing style allows to apply additional settings and visual
effects on the image once it has been calculated.
Creation stages / Use:
Select the Visualization > Post-Processing
Style... command from the drop-down menu.
Give a name to this new post-processing style.
Set the different options.
Validate.

|
The
new style will be available in the Entities
tree into the Styles > Post-Processing
Styles folder.
Right-clicking on a non-current style offers the Make
Current command. It will be then used by default in the
Realistic rendering command.
Right-clicking on a current style offers the command Deactivate.
It is then the Normal
style that will be the current one and used in the Realistic rendering
command. |
Available options:
|
Exposure:
allows to define the global luminous intensity. The value
1 represent a standard exposure to the light. A higher value
allows to overexpose the picture. Saturation
: also allows to influence the picture luminosity. A null
value represent a standard brightness. The more value is high,
the more the picture is saturated.
|
|
This curve
also allows to modify the luminosity but with a more local influence
on the luminosity input range. This is done by changing the curve
shape to define the brightness output according to the initial
brightness (input).
|
|
This option
allows to modify the hue of the light. You can get a warmer light
(red) or colder light (blue).
Click in the color palette to select a hue.
|
|
Allows to modify the contrast factor
of the picture.
The standard
value is 1 and can be changed between 0 and 10.
|
|
Allows
to enhance the sharpness of the generated image.
|
|
Allows
to set a depth of field on the generated image to add blur in
an area of the image.
|
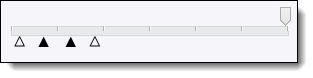
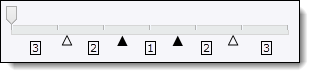
|
On this scale, the left area is
the foreground of the image and the right area the background.
|

Example
of use of the depth of field.
the foreground is net while
the background is blur. |
|
|
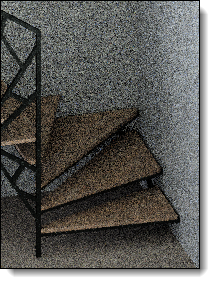
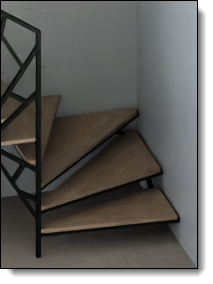
Noise may
appear in your image. It is characterized by grains more or less
numerous on the image which reduces its quality.
This option allows you to correct this effect.
|
|
Without
denoise |
With
denoise |
|
|
By checking
this option this style will be the current style and it will be
used by default in the Realistic
Rendering command.
It will appear in bold in the Styles > Post-processing styles
folder of the entities tree.
|
Modifications / Additional information:
The style can be modified, deleted, deactivated and made current, from
the Styles folder of the entities
tree.
