
|
Two
joints can be created:
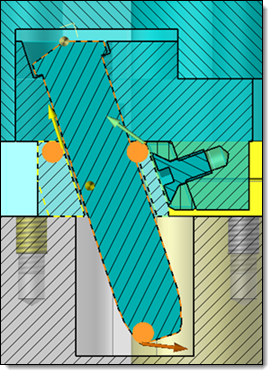
 Angular pin on slide: two intersection
profiles will be created, one with the angle pin and the chosen
plane, the other between the slide and the same plane.
Angular pin on slide: two intersection
profiles will be created, one with the angle pin and the chosen
plane, the other between the slide and the same plane.
Rigid
groups: Angular
pin: It allows
you to select the rigid group of the angular pin to
take in account to create the joint. Slide:
It allows you to
select the rigid group of the slide to take in account
to create the joint.
Angular
pin: Select
the angular pin "around" from where create
the profile. If an angular pin is clicked to select
the angular pin rigid group, then this field is automatically
filled with it. Reverse
the profile:
This option
allows you to determine the orientation of the profile,
which should be such that the orange "disk"
is in the material. It is possible to invert the profile
graphically via the arrow linked to the disk.

|
To
be automatically selected, the angle pin need
provide the Angle
pin function. |
Slide:
Select the slide
"around" from where create the profile.
If a slide is clicked to select the slide rigid group,
then this field is automatically filled with it. Reverse
first/second profile: This
option allows you to determine the orientation of
the profiles, which should be such that the orange
"disk" is in the material. It is possible
to invert the profile graphically via the arrow linked
to the disk.
|
To
be automatically selected, the slide need provide
the Slide
function. |
Plane:
The projection plane
is automatically selected, based of the angle pin
frame. It is also possible to select one, it must
cut longitudinally the slide, through the angle pin
axis.
|
|
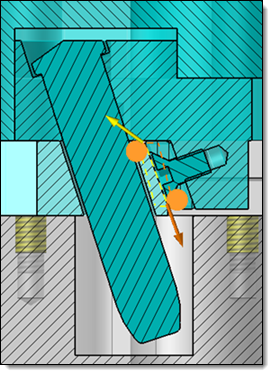
 Locking block on slide: two
intersection profiles will be created, one with the locking block
and the chosen plane, the other between the slide and the same
plane.
Locking block on slide: two
intersection profiles will be created, one with the locking block
and the chosen plane, the other between the slide and the same
plane.
Rigid groups: Locking
block: It
allows you to select the rigid group of the locking
block to take in account to create the joint. Slide:
It allows you to
select the rigid group of the slide to take in account
to create the joint.
locking
block: Select
the locking block "around" from where create
the profile. If an angular pin is clicked to select
the angular pin rigid group, then this field is automatically
filled with it. If it is composed of several parts,
select the locking one. Reverse
the profile:
This option
allows you to determine the orientation of the profile,
which should be such that the orange "disk"
is in the material. It is possible to invert the profile
graphically via the arrow linked to the disk.
|
To
be automatically selected, the locking block need
provide the locking
block function. |
Slide:
Select the slide
"around" from where create the profile.
If a slide is clicked to select the slide rigid group,
then this field is automatically filled with it. Reverse
the profile:
This option
allows you to determine the orientation of the profile,
which should be such that the orange "disk"
is in the material. It is possible to invert the profile
graphically via the arrow linked to the disk.
|
To
be automatically selected, the slide need provide
the Slide
function. |
|
|
|

 icon or select the Mold > Slide Joint...
command from the drop-down menu.
icon or select the Mold > Slide Joint...
command from the drop-down menu. .
.