Groove weld
|
|
Groove weld |
This command creates a groove weld in an assembly.
Creation stages / Use:
Click the icon or select Modeling > Groove Weld... command from the drop-down menu.
|
|
To be able to use the groove welds, it is essential reference the libraries required for the project. The referencing is done by using the Add reference contextual command from the References icon of the project tree. |
Select a type of groove weld seam in the drop down list.
Select the front edge of the weld.
Checking Inverted inverts the direction of the front edge.
Enter an angle to reposition the weld if required.
Checking Limit by neighboring faces to limit the weld extremities by the neighboring faces otherwise
Enter the value of the end withdrawal.
Check Reverse backing if required (to also have the weld on the opposite edge).
Select a type of groove weld seam in the drop down list.
Enter the thickness of the parts to be welded.
Enter the height of the high weld.
Enter the angle of the upper plug.
Enter the height of the plug of the upper weld.
Enter the width of the plug of the upper weld.
|
|
|
|
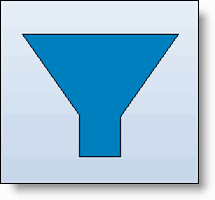
Frontal view of weld with plug height and width different by 0mm |
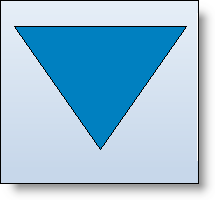
Frontal view of weld without plug height and width ( at 0mm) |
Enter the height of the lower weld.
Enter the angle of the plug of the lower weld.
Enter the height of the plug of the lower weld.
Enter the width of the plug of the lower weld.
|
|
The limit by neighboring faces only supports planar faces. |
|
|
To accumulate the limitation by neighboring faces on one side and an end withdrawal on the other, the weld must be modified locally. |
Options:
Material: To select a specific material for this weld, a material document needs to be opened. Then it will be available in the drop-down list.
Made on side: This information will be automatically indicated in the draft by using the Weld symbol command and by checking the Projected symbol welding option.
Modifications / Additional information:
To modify the type of weld, the faces, the withdrawals, use the Edit contextual command .