Select the index table style to use.
Select the first point of the table or a segment or another table in order to get 2 superposed tables.
If you have picked a point, select the second point.
Validate by clicking  .
.
|
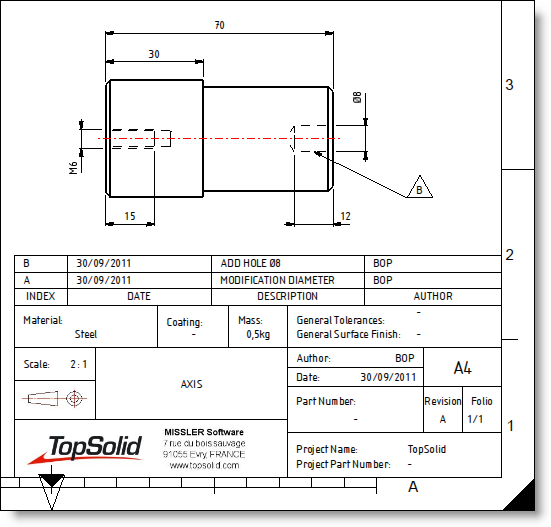
Index table |
This command allows to create an index table into a draft document. This table is linked with difference notes or modification indexes of the projected set
It allows to list all different modifications (with validation) in a draft document.
Creation stages / Use:
Select the Detailing > Index table... command from the drop down menu.
Select the index table style to use.
Select the first point of the table or a segment or another table in order to get 2 superposed tables.
If you have picked a point, select the second point.
Validate by clicking .
|
|
|
They can't be modified or deleted. Only the «Comment» column can be manually modified.
|
|
|
|
Available Options:
Automatic mode:
|
Check this cell to automatically retrieve in the table the modification indexes of the projected set. You must then select in the drop-down list the set containing these indexes.
|
Split:
|
Allows to cut the table if it is too long and split it in several parts positioned side by side or on other pages of the document.
|
Advanced options:
|
Allows to specify if the hook points correspond with the top or bottom of the table.
Allows to position the title line on bottom or top of the table.
Allows the reading direction of the table to be indicated (from bottom to top or from top to bottom).
Allows you to define the horizontal margin. This is the distance between the vertical border of the cell and the start or end of the text.
Allows you to define the vertical margin. This is the distance between the horizontal border of the cell and the start or end of the text.
These two sub-rubricks allow to define:
|
Modifications:
To modify an index table, double click on it or right click on it and select the command Edit .
It is also possible to manually modify the contain and the appearance of the table. To do that, use the "Edit table" contextual command.
|
Insert Line Above: Allows you to add an additional line on top of the selected cell. |
|
Insert Line Below: Allows you to add an additional line below the selected cell. |
|
Insert Column to the Left: Allows you to add a column to the left of the selected cell. |
|
Insert Column to the Right: Allows you to add a column to the right of the selected cell. |
|
Margins: Allows you to change the values of all margins of all cells. |
|
Edit Text Style: Allows you to modify the text style of the table (Font, Height, ...) of the selected cell. |
|
Border Type: Allows you to modify the border type of the selected cell by selecting the type, thickness and color of the lines as well as the borders to modify. |
|
Background Color: Allows you to change the background color of the selected cell. |
|
Make modifiable / Scraping: Allows to change the content of a cell manually. Select the cell then this icon. The modified cells are shown on a yellow background. This color can be customized in drafting options. |
|
Revolve: Allows you to turn (by 90° rotation) the contents of the selected cell. |
|
Merge Cells: Allows you to merge the selected cells. These cells must be dimension-to-dimension. |
|
Insert Setting: Allows you to add the text setting to the cell. |
|
Insert Image: Allows to add an image in the selected cell.
|
|
Align Top: Allows you to align the contents of the cell to the top. |
|
Center: Allows you to center the contents of the cell. |
|
Align Bottom: Allows you to allow the contents of the cell to the bottom. |
|
Delete Line: Allows you to delete a line. This option is available contextually on the grey frame of the table. |
|
Delete Column: Allows you to delete a column. This option is available contextually on the grey frame of the table. |