
Hem bend
|
|
Hem bend |
This command bends the extremity of a sheet on itself.
Creation stages / Use:
Click the  icon or select Sheet Metal > Hem Bend... from the drop-down menu.
Select the edge of the bend (several edges can be selected to create several identical hem bends).
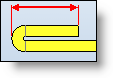
Enter the length of the bend.
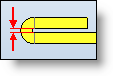
Enter the gap in relation to the reference face (this gap corresponds to the inner diameter of the bend).
Select the bend position regarding the selected edge:
|
|
The bend is done under the selected edge, the initial length of the sheet is not modified. |
|
|
The bend is done on the selected bend, the initial length of the sheet is extended (gap/2 + thickness of the sheet). |
Corresponding parameters:
|
Length |
Gap |
|
|
|
|
|
A hem bend cannot be done when the reference face of the bend (face used to calculate the gap) is cylindrical. |
Available Options:
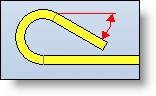
Additional rolling:
By default, the inner face of the bend is parallel to the reference face, the additional rolling angle curves the bend towards the reference face of the value of the indicated angle:
The Automatic rolling curves the bend towards the reference face until the trimming gap defined in the Advanced options section is reached.
|
|
Bend below edge: The bend will not exceed the edge. The sheet metal overall length will not change. |
|
|
Bend upon edge: The bend starts at the edge. The sheet metal overall length will change. |
Width:
Notches:
Advanced options:
|
|
When the flange is made on several edges, you can indicate a gap for the auto-trim of the flange:
|
|
|
This gap is also used when calculating the Automatic rolling. |


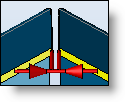 This gap corresponds to the width of the slot where the flanges should intersect.