|
|
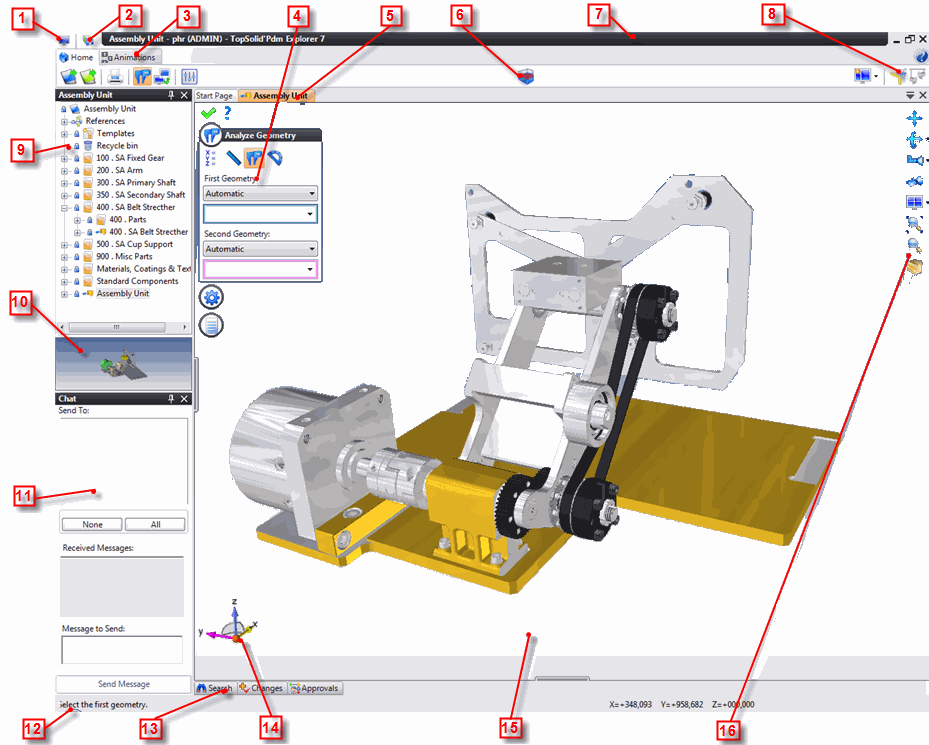
Screen presentation |
The TopSolid'Pdm Explorer 7 screen consists of different zones allowing to manage projects and documents:
|
1 |
TopSolid'Pdm Explorer button |
9 |
Projects window |
|
2 |
System toolbar |
10 |
Documents preview |
|
3 |
Context tabs |
11 |
Chat windows |
|
4 |
Dialog window |
12 |
Dialog area |
|
5 |
Documents tabs |
13 |
Search, Changes, Requests and Approvals tabs |
|
6 |
Context commands (Work bar) |
14 |
Compass |
|
7 |
Banner |
15 |
Workspace |
|
8 |
Context states |
16 |
Visualization and Rendering bar |
1 - TopSolid'Pdm Explorer button
This button, also called the Application icon allows you to access commands for file management, display, document visualization windows, PDM management and exiting the software.
This icon bar groups frequently used TopSolid'Pdm Explorer commands: Save all documents, Print.
Contrary to the context icon bar, it is not customizable.
This area displays the entire set of available commands. The contents of this menu depends on the type of document being opened, as well as installed add-in modules.
This area displays when the name of a command ends in "..." (such as, for example, the Analyze geometry...command) It allows you to enter different information that performs the selected command.
By default, the dialog window displays in the upper-left area of the workspace, but it can also be displayed in the form of an anchored tool window with the TopSolid'Pdm Explorer > Display > Dialog command (click it to turn on the mode).
The top of the dialog window consists of an icon bar allowing you to perform basic commands:
|
|
OK |
Validates the dialog and executes the current command when all necessary data is entered, if any data is missing, this button is grayed out. You can also run the validation by right-clicking and selecting the |
|
|
Cancel |
Closes the dialog without running the current command. You can also close the document by right-clicking and selecting the |
|
|
Help |
Launches the online help of the current command. You can also launch the help by pressing the F1 key on the keyboard. |
|
|
Thumbtack in |
Allows you to select the operation mode of the command. If the thumbtack is in, the command will automatically restart after use, which allows you to concatenate, for example, multiple fillets without relaunching the command. However, if the thumbtack is not it, the command only works once. |
|
|
Thumbtack out |
This area contains the list of open documents; each document is open in a window with a tab containing the name and icon of the type of document. It can also be followed by symbols that describe the status of the document:
|
Symbol |
Example |
Document status |
|
* |
|
Modified document. |
|
Document Name: Window # |
|
Document open in several windows. |
When multiple documents are open, the tab of the current document has an orange background. Furthermore, in the right part of the window, the 
 icons allow you to respectively display the list of open documents in order to select the new current document and close the current document.
|
|
|
6 - Context commands (work bar)
The command bar contains the most frequently used commands of the chosen context. Selecting a command generally triggers the display of command options in the Dialog Panel.
Commands are displayed in the left part of the context, whereas states (or modes) are displayed in the right part.
The banner displays the name of the current document, as well as the name of the connection as well as the user name between brackets displays.
States (or modes) allow you to set the options of the current context, select the mode when the icon is on an orange background (orange is the default active color and can be configured in the Window feature of the Window of the Tools > Options... command).
For example in the Home context, the display lateral faces mode allows you to display lateral faces of sheet metal parts.
When a project is created, its contents automatically displays in the project management window also called the project tree.
This window, similar to Windows Explorer, allows you to manage the set of documents in your project; most of the commands can be accessed from different displayed popup menus when you click a project item.
The most frequently used commands can be performed with the mouse:
Double-click an item to open it.
Select an item then click the selected item again to rename this item.(only for non TopSolid documents like texts, images, videos, ...).
Informations about states of documents are displayed in the projects tree.
|
|
The document is created. It is no longer available for other users. It is located in the user workspace. |
|
|
The document was in the vault, it is now under modification. The vault version is only available for consult in read only mode for another user. The document under modification is located in the workspace. |
|
|
Document in vault, but not validated. It is available for other users. |
|
|
Validated document. It is available for other users. |
|
|
Obsolete document. |
The preview area displays a preview of the selected document as long as this document was created by a TopSolid 7 application.
The preview of a document is calculated from shapes contained in the document with the Shadowed Rendering with Edges, Perspective Camera and Global Zoom settings. However, some types of documents, such as threading standards and unfolding rules, do not have a preview.
This window allows to chat with others connected TopSolid users (on the same Pdm). You can for example ask to check in a part.
The dialog area displays messages that guide you through each command. The right part contains the coordinates of the cursor in relation to the absolute frame.
13 - Search, Changes, Requests and Approvals tabs
This area automatically opens when you slide your cursor over one of the tabs, in the same way that it automatically closes when your cursor remains outside the tab for a few seconds.
The Search tab allows you to search the document based on different criteria (see the Search command for details).
The Changes tab allows you to quickly view documents currently open by different users connected to the same PDM server (see the Changes page for details).
The Requests tab allows to visualize pending approvals requests (see the Requests page for details).
The Approvals tab allows to visualize and answer to the approvals requests (see the Approvals page for details).
|
|
Search and change tabs can be displayed/hidden with the Changes, Search, Requests and Approvals commands of the TopSolid'Pdm Explorer button > Display menu. |
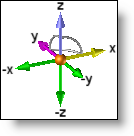
The default position (lower left) displays the orientation of the absolute frame.
|
Negative Axes: |
|
|
You can display the X-, Y- and Z- axes by positioning the cursor next to the assumed location of these axes, they will then appear in blue. |
|
The workspace allows you to view the document being modified. The workspace allows you to view the document being modified. The management commands of this area (Zoom, Orientation, Multiple Windows, Rendering, etc.) are grouped in an icon bar called Visualization and Rendering Bar found to the right of this area.
The mouse buttons also allow you to quickly access certain commands:
Zoom: Turn the wheel of the mouse to zoom in or out of the view.
Rotation: Click and hold down the middle button to turn the view contents.
Furthermore, you can indicate a rotation axis by positioning the cursor on an item (edge, segment, etc.), and pressing the Alt key on your keyboard.
Translation (Panoramic): Click and hold down the right mouse button to move the view contents.
Furthermore, you can indicate a translation axis by positioning the cursor on an item (edge, segment, etc.), and pressing the Alt key on your keyboard.
|
|
When the workspace is divided into multiple views, the active view is identified by a black edge, the view also contains the compass and the visualization and rendering bar. |
16 - Visualization and Render bar
The visualization and rendering bar groups Visualization commands, these commands allow you to quickly act on the document being modified.
|
Icon |
Command |
|
|
Displacement of View (Panoramic). |
|
|
View rotation and access to Rotate view and lock view commands. |
|
|
Face view and access to other views (above, right, etc...). |
|
|
Perspective View. |
|
|
Split workspace into 4 views and access other split commands (1 view, 2 views, etc...). |
|
|
Best Zoom. |
|
|
Window Zoom. |
|
|
Shadowed rendering with edges and access to rendering commands (see the different rendering modes for more details). |
|
|
The contents of this bar can be modified with the Tools > Customize command. |