Realistic rendering - Post-treatment


Links / Videos :


These options are available from the preview windows of the Realistic rendering command. They allow to apply additional settings and visual effects on the image once it has been calculated.


Available Options:


The options are arranged in two tabs:


This tab allows to adjust the brightness parameters of the picture.


Tone mapping: this option allows to define the global luminosity of the picture. Example


  • Exposure: allows to define the global luminous intensity. The value 1 represent a standard exposure to the light. A higher value allows to overexpose the picture.


  • Saturation: also allows to influence the picture luminosity. A null value represent a standard brightness. The more value is high, the more the picture is saturated.


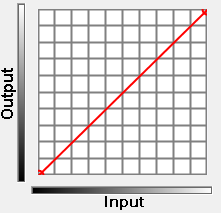
Intensity correction: this curve also allows to modify the luminosity but with a more local influence on the luminosity input range. This is done by changing the curve shape to define the brightness output according to the initial brightness (input). Example


White balance: this option allows to modify the hue of the light. You can get a warmer light (red) or colder light (blue).


Gamma correction: allows to modify the contrast factor of the picture. The standard value is 1 and can be changed between 0 and 10.


Sharpen: allows to enhance the sharpness of the generated image.


Depth of field: allows to set a depth of field on the generated image to add blur in an area of the image.


On this scale, the left area is the foreground of the image and the right area the background.

  • Upper cursor: adjusts the blur intensity (left = no blur; right = max blur).

  • Area 1: net area.

  • Area 2: intermediate area.

  • Area 3: blur area.


Example of use of the depth of field.

the foreground is net while the background is blur.


Reset: this button allows to restet all the option values of this tab.


It is possible to reset the intensity correction curve and the white balance individually by right clicking on it and selecting the "reset" command"


This tab allows to add visual effects on the picture.


Glow: this option allows to add a glow effect on the more luminous areas of the picture. Example


  • Radius: allows to define the glow diffusion. The value can be changed between 1 and 100. The higher the value is the more the glow spreads out.


  • Intensity: allows to define the intensity of the glow. The value can be changed between 0,01 and 1.


  • Brightness threshold: allows to define the brightness threshold beyond which a pixel will produce a glow. For example, a brightness threshold set to 0,7 means that all pixels with a brightness higher than 0,7 will produce a glow.


Sparkle: this option allows to add a glare effect. Example


  • Brightness threshold: allows to define the percentage of the brighter pixels on which the effet will be applied. The value can be given in %, ‰ or unit (value from 0 to 1). For example, a brightness thresholdset at 2% means that 2% of the brighter pixels of the picture will be taken in account for the creation of the effect.


  • Sparks average count: allows to define the average density of sparks inside the area of pixels defined by the option above.


  • Intensity: allows to define the sparks brightness. The value can be set between 0 and 1


  • Transparency: allows to define the transparency factor of the sparks. The value can be set between 0,1 and 1.


  • Spike length: allows to define the spike length of the sparks. The value can be changed between 1 and 100.


  • Spike angle: allows to modify the orientation of sparks on the picture.


  • Spike count: allows to define the spike number on each spark.


This option allows to save the current settings or select and apply a previously saved preset.


The drop down list contains the list of the saved presets. Select one to apply theses settings on the options.


Set a temporary parameters : this button allows to save the current setting as a temporary preset. This preset is only memorized until TopSolid is closed. The memorization of a new temporary preset overwrite the previous one.


Save parameters : this button allows to save the current parameters as a new preset. A name must be given and this preset is then added to the available presets list.


Edit presets : this buttons opens a box that list all the presets saved. It is possible to rename them (simply click on the name) or delete them (select the preset and click on the "suppr" key).