Spline
|
|
Spline |
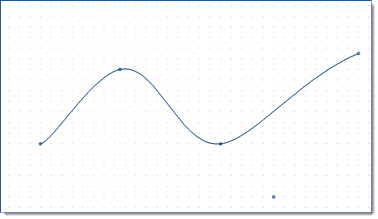
A Spline curve is created by indicated the points of the curve.
Creation Stages / Use:
Click on the  icon or select the 2D sketch or 3D sketch > Other curves > Spline... command from the drop-down menu. In a Draft o a Drawing document, select the Sketch > Other curves > Spline... command from the drop-down menu.
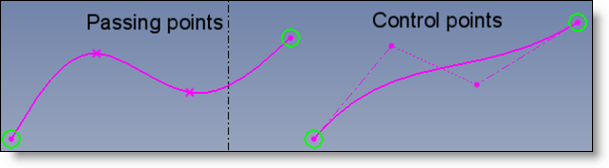
Select the type of spline between Passing points, Control points, Blend or Aspline :
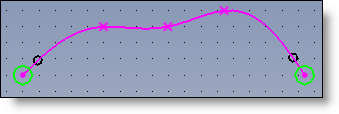
Passing points: The entering points are whose where the spline passes.
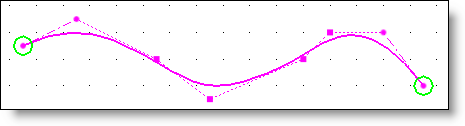
Control points: The curve is constrained by the entered points.
|
|
|
|
Passing points |
Control points |
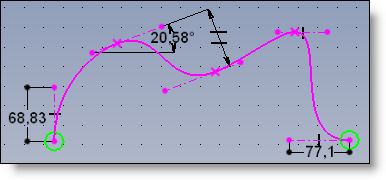
Blend: allows to create an tangent curve to two others. By default, the tangents length is equal to 1/3 of the distance between the vertices of the 2 curves. This constraint can be modified with 2 constraints.
Aspline: The Aspline is composed of lines, by arcs or ellipses passing by entering points. It is possible to change the Aspline during its creation. For example you can begin with the line mode, and continue with the arc mode.
Position and/or enter coordinates of the spline points or for the blend, select the 2 entities to blend.
Validate with  .
.
|
|
The ASpline is a specific Spline. It consists of lines, arcs or ellipses depending on the selected type. This type of spline allows moving a point along the curve and passing the various peaks. It has an actual advantage, such as, for example, for designing a parameterized staircase where it is necessary to move the boundary points of a step along a sketch. |
Options available for the Spline with clearance points:
Mode: (Usefull for the modification)
|
|
Origin Spline :
|
Closed:
|
|
Check Closed to create a closed spline curve.
|
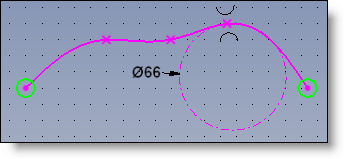
Zero curvature:
|
|
When this option is checked, it causes a null curvature at the two ends of the spline. These constraints, symbolized by a black circle, can be separately enabled/disabled by a popup menu option near one one of the curve. |
|
|
|
Options available for the Spline with control points:
Closed:
|
|
Check Closed to create a closed spline curve. |
Zero curvature:
|
|
When this option is checked, it causes a zero curvature at the two ends of the spline. These constraints, symbolized by a black circle, can be separately enabled/disabled by a popup menu option near one of the curve. |
|
|
|
Options available for the Blend:
Tense:
|
|
A tense spline will be less malleable when it or its interpolation points are moved. There is a popup menu option on a non-tense curve for making it tense. This can cause a change to the geometry of the curve in order to create a more constant curvature. |
Zero curvature:
|
|
When this option is checked, it causes a null curvature at the two ends of the spline. These constraints, symbolized by a black circle, can be separately enabled/disabled by a popup menu option near one of the curve. |
|
|
|
Options available for the ASpline:
Closed:
|
|
Check Closed to create a closed spline curve. |
Additional Information / Modifications:
Tangents:
Tangents at points of interpolation can be constraints.
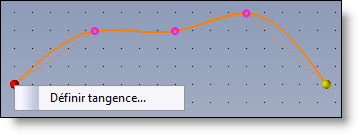
To define tangency:
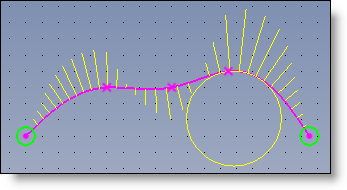
Handles (yellow spheres) at the ends of the curve allow tangencies to be defined through the popup menu when creating the curve. After activating the command, select the start or end tangent (line, axis, etc.). When the spline is validated, constraints between the tangent and referent element will automatically be created.
Show curvature:
A popup menu option on a spline makes it possible to view its curvature.
The circle symbolizes the area with the greatest curvature.
Curvature circle:
A popup menu option on a point of interpolation allows the curvature circle at the point to be displayed and constrained.
Global scaling:
Global scaling is triggered when modifying a constraint between two points of interpolation on a large-dimension spline.
Displacement:
By default, the dynamic movement on tangency constraints and interpolation points are local. But using the Alt key on the keyboard during movement triggers a global modification. (It may sometimes be necessary to authorize such a movement in order to achieve the desired result.)

 Free
Free Balanced tangents
 Tight
Tight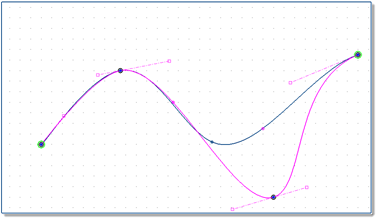
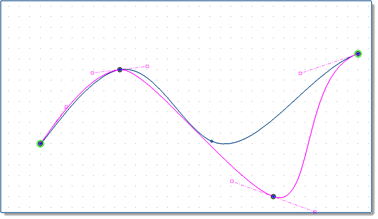

 If we want to make a modification, we recommend to use the Balanced tangents mode.