![]()
Verify
|
|
Verify |
Development:
Particularly for 3D millings on complex shapes, this function allows you to check several operations by simulating the removal of material completed. The result corresponds to the state of the stock as it will be once the selected operations have been performed.
|
Simulation |
|
|
|
Verify |
|
|
|
Comparison |
|
|
The verification:
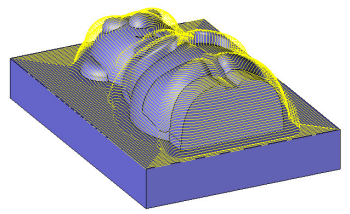
From the raw part, TopSolid'Cam simulates the material removal for each operation. A different color is automatically assigned to each tool in order to easily distinguish the milled areas. An area that appears in red is synonymous with a rapid movement on the part (to be avoided).
The Start in Turbo Mode  feature allows you to pass quickly to the final result (calculated by Z buffer). This refers particularly to 3D milling operations but can only be used in one WCS at a time.
The Start Animation Mode feature allows you to simulate milling operations (calculated using a polyhedral modeler). In addition, this mode is based on a realistic model that allows the milling simulation of up to five axes.
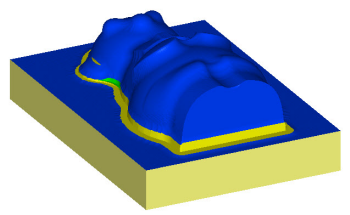
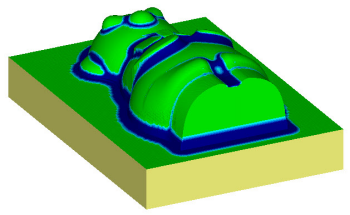
Comparison:
After the simulation, you can request to compare the stock and the finish. A color code from maroon to blue allows you to evaluate the positive and negative stocks to left after milling.
Green is used for all facets on the finish.

 Warning: The validity of the comparison result depends on the tolerances used to do the calculations.
|
|
Resets the verification. |
|
|
|
Defines the color used for each tool on faces for the verification. |
|
|
|
Displays or hides the stock. |
|
|
|
Displays or hides the finish. |
|
|
|
Starts the comparison. |
|
|
|
Displays the trajectories. |
|
|
|
Displays the list of collisions. |
|
|
|
It allows to not display the tool during the verification. This option (which allows to have a faster result) is available if the simulation mode is by elements |
|
|
|
It allows to limit the verification in a rectangle. |
|
|
|
During the verification of an operation this option allows to update the previous operations if the update stock hasn't been activated in these operations. Simply select the operation to update and choose the update stock method.
|
|
|
|
Configures the verification options. |
To verify the entire range, click the ![]() Verification tab, then click the
Verification tab, then click the  icon to initialize the verification.
You can also select millings from the range and right-click to check certain operations. In this case, the initial stock used by TopSolid is the last update before the first selected operation.
Display options
 |
This option allows to activate or deactivate the stock update. When the stock update is deactivated it allows a quick check of machine collisions (when the stock is almost identical to the finish as for a 5-axis finish). |
 |
This option allows to switch from programmation mode to machine mode in order to do a verification in machine mode. |
 |
This option allows to activate or deactivate the collision detection. |
Animation options
The verification can be performed in animation mode or turbo mode .
|
|
Return to start of verification |
|
|
Allows to do pauses. |
|
|
Jump to the next block. |
|
|
Allows to choose if we simulate by element (an update after each entity of the operation) or by length (the number of updates depends on the speed). In "element" mode the verification will be faster but less precise. In both modes the speed can be modulated with the simulation speed cursor. |
|
|
In element mode this option allows to not simulate the tool or to adjust how ofter views are updated (with the same precision it is faster when the tool is not present). |
|
|
Allows to exit the verification. |
In machine mode some options are no longer accessible.
 Keyboard and shortcuts:
|
+ |
Increase the speed in split tool path by "length" and increase the number of cuts between each update of the view in "element" mode. |
|
- |
Decrease the speed in split tool path by "length" and decrease the number of cuts between each update of the view in "element" mode. |
|
Space |
Switch between pause/play during the simulation. |
|
Return to the line |
Return to start of verification |
|
N |
Step by step (pauses). |
|
/ |
Go to next cut. |
|
M |
Switch between element mode and length mode. |
|
* |
Step by step, in interpolation mode. |
|
T |
Hide/Show the tool path. |
|
S |
Switch the display style of the tool path (from the beginning, last cuts, all the operation) |
|
Arrows (Left/Right) |
Decrease/increase the number of cuts to display in the tool path (for the mode « N last cuts ») |
|
Escape |
If one of the views is in mode « zoom by box» or « limit the verification to an area », cancel the current order. If the verification is already limited to an area we go back to the beginning by canceling the limitation area. |
|
|
It is possible to use the right click on the part in the verification mode. We then have all the visualization options in the menu. Two additional options are available:
|


 (CTRL+ M allows to switch between the 2 modes)


